오늘은 GUI, Tkinter의 Window, Label, Button, Canvas에 대해 알아보고 간단한 제비뽑기 프로그램을 만들어봤다.
1 GUI란?
GUI: 소프트웨어의 조작 방법을 직관적으로 알 수 있게 해주는 인터페이스
1.1 윈도우 표시하기
import tkinter

root = tkinter.Tk() # 윈도우 요소(객체) 생성
root.mainloop() # 윈도우 표시
tkinter.Tk() 명령으로 윈도우 요소(객체)를 생성할 수 있다.
mainloop 명령으로 화면에 윈도우를 표시할 수 있다.

1.2 제목과 크기 지정하기
import tkinter

root = tkinter.Tk()
root.title("첫 번째 윈도우") # 윈도우 제목 지정
root.geometry("800x600") # 윈도우 크기 지정
root.mainloop()
제목은 title, 크기는 geometry 명령으로 지정할 수 있다.
2 라벨 배치하기
2.1 라벨 배치
import tkinter

root = tkinter.Tk()
root.title("첫 번째 윈도우")
root.geometry("800x600")
# 라벨 컴포넌트 생성
label = tkinter.Label(root, text="라벨 문자열", font=("Times New Roman", 24))
# 윈도우에 라벨 배치
label.place(x=200, y=100)
root.mainloop()
라벨은 Label 명령으로 만들고 place 명령으로 배치한다.
아래 같이 라벨이 지정한 위치에 생성된다.
2.2 사용 가능한 폰트 확인
import tkinter
import tkinter.font

root = tkinter.Tk()
fonts = tkinter.font.families()
print(len(fonts))
무려 553개나 사용할 수 있다! 하지만 계속 Times New Roman을 사용할 예정이다.
3 버튼 배치하기
3.1 버튼 배치
import tkinter

root = tkinter.Tk()
root.title("첫 번째 버튼")
root.geometry("800x600")
# 버튼 컴포넌트 생성
button = tkinter.Button(root, text="버튼 문자열", font=("Times New Roman", 24))
# 윈도우에 버튼 배치
button.place(x=200, y=100)
root.mainloop()
라벨과 마찬가지로 버튼은 Button 명령으로 만든 뒤 place 명령으로 배치한다.
아직은 버튼을 눌러도 아무 반응이 없다.
3.2 버튼 클릭 시 반응
import tkinter

# 버튼 문자열 변경 함수
def click_btn():
    button["text"] = "클릭했습니다"

root = tkinter.Tk()
root.title("첫 번째 버튼")
root.geometry("800x600")
# 버튼 컴포넌트 생성 -> command=로 클릭 시 동작할 함수 지정
button = tkinter.Button(root, text="버튼 문자열",
                        font=("Times New Roman", 24), command=click_btn)
button.place(x=200, y=100)
root.mainloop()
버튼을 클릭했을 때의 처리를 함수로 정의해놓고, 버튼을 생성하는 식 안에 'command=함수'를 입력하면
버튼을 클릭했을 때 해당 함수를 실행하고 이를 확인할 수 있다.
이제 버튼을 누르면 "버튼 문자열"이 "클릭했습니다"로 바뀐다.
4 캔버스 사용하기
캔버스: 이미지나 도형을 그리는 GUI
4.1 캔버스 배치
import tkinter

root = tkinter.Tk()
root.title("첫 번째 캔버스")
# 캔버스 컴포넌트 생성
canvas = tkinter.Canvas(root, width=400, height=600,
                       bg="skyblue")
# 윈도우에 캔버스 배치
canvas.pack()
root.mainloop()
캔버스는 Canvas 명령으로 생성하고 pack, place 명령으로 배치한다.
pack() 명령으로 배치하면 캔버스 크기에 맞춰 윈도우 크기가 결정된다.
윈도우에 캔버스만을 배치하는 경우에는 아래 코드와 같이 root.geometry()를 생략할 수 있다.
4.2 캔버스에 이미지 표시하기
import tkinter
root = tkinter.Tk()
root.title("첫 번째 캔버스")
canvas = tkinter.Canvas(root, width=400, height=600)
canvas.pack()
# gazou에 이미지 파일 로딩
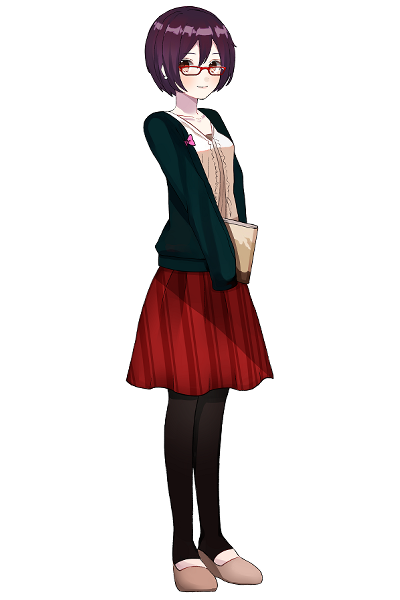
gazou = tkinter.PhotoImage(file="hyunju.png")
# 캔버스에 이미지 그리기
canvas.create_image(200, 300, image=gazou)
root.mainloop() 캔버스에 이미지를 표시할 때는 PhotoImage 매서드로 이미지를 로딩하고
create_image 매서드로 이미지를 그린다.
create_image() 명령에 지정한 X, Y 좌표는 이미지의 중점이다. 다른 값을 넣으면 이미지가 잘린다.
5 제비뽑기 프로그램 만들기
앞에서 봤던 라벨, 버튼, 캔버스를 사용해서 간단한 제비뽑기 프로그램을 만들어 보자!
5.1 이미지 표시
import tkinter
root = tkinter.Tk()
root.title("제비봅기 프로그램")
# 윈도우 크기 고정
root.resizable(False, False)
canvas = tkinter.Canvas(root, width=800, height=600)
canvas.pack()
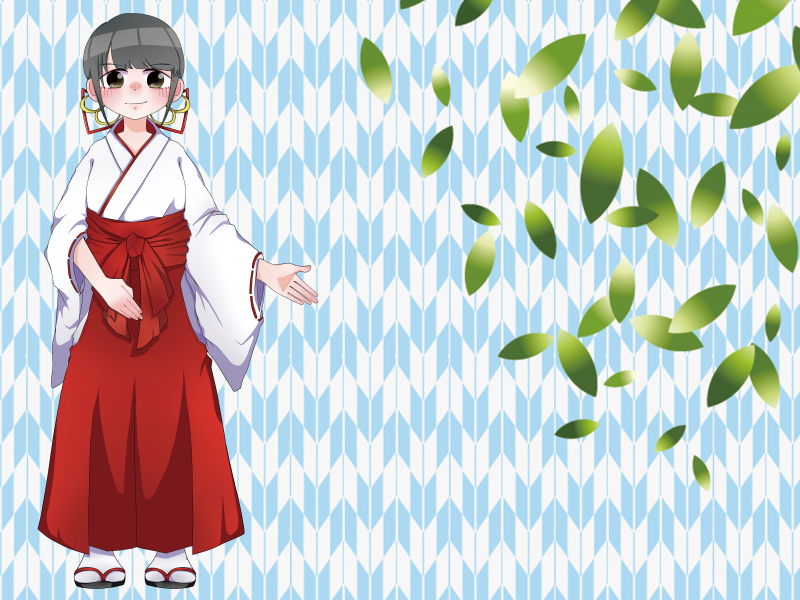
gazou = tkinter.PhotoImage(file="miko.png")
canvas.create_image(400, 300, image=gazou)
root.mainloop() 우선 캔버스를 배치하고 이미지를 표시한다.
resizable() 명령으로 윈도우 크기를 변경하지 못하게 한다.
첫 번째 인수는 가로 방향 크기 변경 여부, 두 번째 인수는 세로 방향 크기 변경 여부를 의미한다.
5.2 GUI 배치
import tkinter

root = tkinter.Tk()
root.title("제비봅기 프로그램")
root.resizable(False, False)
canvas = tkinter.Canvas(root, width=800, height=600)
canvas.pack()
gazou = tkinter.PhotoImage(file="miko.png")
canvas.create_image(400, 300, image=gazou)

# 라벨 추가
label = tkinter.Label(root, text="??", font=("Times New Roman", 120),
                        bg="white")
label.place(x=380, y=60)
# 버튼 추가
button = tkinter.Button(root, text="제비뽑기", font=("Times New Roman", 36),
                        fg="skyblue")
button.place(x=360, y=400)

root.mainloop()
두 번째로 캔버스 상에 라벨과 버튼을 배치했다.
5.3 버튼 클릭 시 반응하기
import tkinter

# 버튼 클릭시 실행될 함수 정의 -> 라벨 문자열 무작위로 변경
def click_btn():
    label["text"] = random.choice(["대길", "중길", "소길", "흉"])
    label.update()

root = tkinter.Tk()
root.title("제비봅기 프로그램")
root.resizable(False, False)
canvas = tkinter.Canvas(root, width=800, height=600)
canvas.pack()
gazou = tkinter.PhotoImage(file="miko.png")
canvas.create_image(400, 300, image=gazou)

label = tkinter.Label(root, text="??", font=("Times New Roman", 120),
                        bg="white")
label.place(x=380, y=60)
# 버튼 생성, command 인자로 클릭 시 호출할 함수 지정
button = tkinter.Button(root, text="제비뽑기", font=("Times New Roman", 36),
                        fg="skyblue", command=click_btn)
button.place(x=360, y=400)

root.mainloop()
버튼을 클릭할 때 제비뽑기 결과가 표시되도록 했다.
버튼을 누르면 대길. 중길, 소길, 흉 중 랜덤으로 하나가 표시된다!
6 캔버스에 도형 그리기
import tkinter

root = tkinter.Tk()
root.title("캔버스에 도형 그리기")
root.geometry("500x400")
cvs = tkinter.Canvas(root, width=500, height=400, bg="white")
cvs.pack()
cvs.create_text(250, 25, text="문자열", fill="green", font=("Times New Roman", 24))
cvs.create_line(30, 30, 70, 80, fill="navy", width=5)
cvs.create_line(120, 20, 80, 50, 200, 80, 140, 120, fill="blue", smooth=True)
cvs.create_rectangle(40, 140, 160, 200, fill="lime")
cvs.create_rectangle(60, 240, 120, 360, fill="pink", outline="red", width=5)
cvs.create_oval(250 - 40, 100 - 40, 250 + 40, 100 + 40, fill="silver", outline="purple")
cvs.create_oval(250 - 80, 200 - 40, 250 + 80, 200 + 40, fill="cyan", width=0)
cvs.create_polygon(250, 250, 150, 350, 350, 350, fill="magenta", width=0)
cvs.create_arc(400 - 50, 100 - 50, 400 + 50, 100 + 50, fill="yellow", start=30, extent=300)
cvs.create_arc(400 - 50, 250 - 50, 400 + 50, 250 + 50, fill="gold", start=0, extent=120, style=tkinter.CHORD)
cvs.create_arc(400 - 50, 350 - 50, 400 + 50, 350 + 50, outline="orange", start=0, extent=120, style=tkinter.ARC)
cvs.mainloop()
직선: create_line(x1, y1, x2, y2, fill=?, width=?)
사각형: create_rectangle(x1, y1, x2, y2, fill=?, outline=?, width=?)
타원형: create_oval(x1, y1, x2, y2, fill=?, outline=?, width=?)
다각형: create_polygon(x1, y1, x2, y2, x3, y3, ..., fill=?, outline=?, width=?)
원호: create_arc(x1, y1, x2, y2, x3, y3, ..., fill=?, outline=?, start=?, extent=?, style=?)
끝!
여기까진 책에서 본 그래도 따라한 거니까, 이번엔 제비뽑기 말고 다른 걸로 직접 프로그램을 만들어봐야겠다.
코드 github: https://github.com/kimjinho1/Python-Game/blob/main/GUI%20%EA%B8%B0%EC%B4%88%201(tkinter)/GUI%20%EA%B8%B0%EC%B4%88%201.ipynb
kimjinho1/Python-Game
Contribute to kimjinho1/Python-Game development by creating an account on GitHub.
github.com
'파이썬 게임 개발' 카테고리의 다른 글
| 파이썬으로 미로 게임 구현하기 2 (0) | 2021.06.29 |
|---|---|
| 기본적인 게임 개발 기술(실시간 처리, 키 입력 받기, 미로 게임) (0) | 2021.06.28 |
| 파이썬 GUI 기초 2(Tkinter, 고양이 지수 진단 프로그램) (0) | 2021.06.24 |
| pyinstaller로 내가 만든 게임 exe파일 생성하기 (0) | 2021.06.23 |
| 파이썬으로 가위바위보 게임 구현하기(Tkinter) (0) | 2021.06.22 |