728x90
반응형

여름방학 때 학교에서 상금 같은 것이 들어왔길래 뭔가 했었는데 알고 보니 상을 받은 것이었다.

 만든 작품은 블로그에도 올라와있는 얼굴 인식 모자이크 프로그램이다.

처음에는 조금 삽질을 했었는데 좋은 경험이었던 것 같다.

현재는 사회복무요원을 하고 있다. 2022년 8월 31일... 소집 해제할 때에는 쓸만한 예비 개발자가 돼있으면 좋겠다.

우수상

728x90
반응형
728x90
반응형

저번에 얼굴 인식을 하는 프로젝트를 진행했었는데

이 기술을 활용해서 닮은 연예인을 찾아주는 프로그램을 만들어보았다. 

얼굴 인식을 어떻게 하는 건지 궁금하다면 아래 글을 보도록 하자.

실시간 얼굴 인식과 모자이크 처리: https://jinho-study.tistory.com/249


실시간 얼굴 인식과 모자이크 처리

꽤 전에 완성을 했었는데 블로그에 올린다는 것을 완전히 까먹고 있었다. 전에 얼굴 탐지 및 전처리, 데이터 크롤링 등등의 글들을 올렸었는데, 그 이후 조금의 삽질 과정이 있었고 결국 완성했�

jinho-study.tistory.com

이번 닮은 연예인 찾기에서는 데이터베이스에 한국 연예인, 유명인 등을 100명 정도 저장해놓았다.

이런 식으로 이미지가 저장되어있다.


탐지된 사람의 랜드마크와 데이터베이스의 랜드마크 중 제일 짧은 거리에 속하는 사람을 알려주는 간단한 프로그램이다. 

거리가 너무 먼데도 닮은 사람이라고 하면 안 되기 때문에 0.5를 기준으로 정해주었다.

우선 아래의 모델들이 필요하니 주소를 통해 다운로드하여야 한다.

github.com/davisking/dlib-models/raw/master/shape_predictor_68_face_landmarks.dat.bz2

github.com/kairess/simple_face_recognition/raw/master/models/dlib_face_recognition_resnet_model_v1.dat

github.com/kimjinho1/Real-time-face-recognition-and-mosaic-using-deep-learning/raw/master/models/dlib_face_recognition_resnet_model_v1.dat

코드는 이전과 많이 다르지 않다.

라이브러리)

import dlib, cv2
import numpy as np
import matplotlib.pyplot as plt
from PIL import ImageFont, ImageDraw, Image
import tensorflow.keras 
from tensorflow.keras import backend as K
import glob

detector = dlib.get_frontal_face_detector()
sp = dlib.shape_predictor('models/shape_predictor_68_face_landmarks.dat')
facerec = dlib.face_recognition_model_v1('models/dlib_face_recognition_resnet_model_v1.dat')


사용한 함수들)

def find_faces(img):
    dets = detector(img, 1)

    if len(dets) == 0:
        return np.empty(0), np.empty(0), np.empty(0)
    
    rects, shapes = [], []
    shapes_np = np.zeros((len(dets), 68, 2), dtype=np.int)
    for k, d in enumerate(dets):
        rect = ((d.left(), d.top()), (d.right(), d.bottom()))
        rects.append(rect)

        shape = sp(img, d)
        
        # convert dlib shape to numpy array
        for i in range(0, 68):
            shapes_np[k][i] = (shape.part(i).x, shape.part(i).y)

        shapes.append(shape)
        
    return rects, shapes, shapes_np


def encode_faces(img, shapes):
    face_descriptors = []
    for shape in shapes:
        face_descriptor = facerec.compute_face_descriptor(img, shape)
        face_descriptors.append(np.array(face_descriptor))

    return np.array(face_descriptors)
    
    
def draw(img, comment, x, y, h, size):
    img = Image.fromarray(img)
    draw = ImageDraw.Draw(img)
    draw.text((x+5,y+h), comment, font=ImageFont.truetype("./batang.ttc", size), fill=(40,180,120))
    
    return np.array(img)  


데이터 베이스 생성)

label_name = []
label_class = {}
img_paths = glob.glob("kpop_img/*")

for path in img_paths:
    name = path.split(".")[0][9:]
    label_name.append(name)
    label_class[name] = path

#print(label_name)
print(len(label_class))
descs = []

for name, label_path in label_class.items():
    img = cv2.imread(label_path)
#    img = cv2.cvtColor(img, cv2.COLOR_BGR2RGB) # BGR -> RGB
    _, img_shapes, _ = find_faces(img)
    descs.append([name, encode_faces(img, img_shapes)[0]])

np.save('descs.npy', descs)
#print(descs)


닮은 연예인 찾기(저장된 사진으로 찾기)

img = cv2.imread('test_img/taeyeon.jpg')
#img = cv2.imread('test_img/chen.jpg')
#img = cv2.imread('test_img/jinho.jpg')

img = cv2.flip(img, 1) # 좌우 대칭
rects, shapes, _ = find_faces(img) # 얼굴 찾기
descriptors = encode_faces(img, shapes) # 인코딩

if(len(descriptors) == 0):
    print("얼굴 인식이 안되었네요ㅜㅜ \n다시 찍어주세요!")
elif(len(descriptors) > 1):
    print("여러 명이 인식이 되었네요ㅜㅜ \n혼자 다시 찍어주세요!")
else:
    desc = descriptors[0]
    x = rects[0][0][0] # 얼굴 X 좌표
    y = rects[0][0][1] # 얼굴 Y 좌표
    w = rects[0][1][1]-rects[0][0][1] # 얼굴 너비 
    h = rects[0][1][0]-rects[0][0][0] # 얼굴 높이        

    descs1 = sorted(descs, key=lambda x: np.linalg.norm([desc] - x[1]))
    dist = np.linalg.norm([desc] - descs1[0][1], axis=1)
    if dist < 0.5:
        name = descs1[0][0]
        comment = "{0}을 닮으셨네요. 올~~".format(name) 
        img = cv2.imread(label_class[name])
#             img = cv2.resize(img, dsize=(780, 520))
        result = draw(img, comment, x-10, y, h, 36)
    else:
        comment = "닮은 연예인이 없네요\nㅜㅜ 성형하고 오세요!\n"
        img = cv2.imread("test_img/ojingeo.jpg")
        result = draw(img, comment, 50, 10, h, 24)

    print("거리: %.3f" % dist[0])
    print(comment)
#    cv2.imshow(name, result)
    result = cv2.cvtColor(result, cv2.COLOR_BGR2RGB) # BGR -> RGB
    plt.imshow(result)

cv2.waitKey(0)
cv2.destroyAllWindows()


닮은 연예인 찾기(실시간으로 찍어서 찾기)

버전 1)

user_name = input("너의 이름은? ") # 사용자 이름 입력

cap = cv2.VideoCapture(0) # 노트북 웹캠을 카메라로 사용
cap.set(3,640) # 너비
cap.set(4,480) # 높이

while(True):
    ret, frame = cap.read()
    frame = cv2.flip(frame, 1) # 좌우 대칭
    
    cv2.imshow('frame', frame)
    
    k = cv2.waitKey(30) & 0xff 
    if k == 49: # 1 키를 누르면 사진 찍음.
        cap.release()
        cv2.destroyAllWindows()
        
        rects, shapes, _ = find_faces(frame) # 얼굴 찾기
        descriptors = encode_faces(frame, shapes) # 인코딩

        if(len(descriptors) == 0):
            print("얼굴 인식이 안되었네요ㅜㅜ \n다시 찍어주세요!")
        elif(len(descriptors) > 1):
            print("여러 명이 인식이 되었네요ㅜㅜ \n혼자 다시 찍어주세요!")
        else:
            desc = descriptors[0]
            x = rects[0][0][0] # 얼굴 X 좌표
            y = rects[0][0][1] # 얼굴 Y 좌표
            w = rects[0][1][1]-rects[0][0][1] # 얼굴 너비 
            h = rects[0][1][0]-rects[0][0][0] # 얼굴 높이        

            descs1 = sorted(descs, key=lambda x: np.linalg.norm([desc] - x[1]))
            dist = np.linalg.norm([desc] - descs1[0][1], axis=1)
            if dist < 0.5:
                name = descs1[0][0]
                comment = "{0}을 닮으셨네요. 올~~".format(name) 
                img = cv2.imread(label_class[name])
#                 img = cv2.resize(img, dsize=(780, 520))
                result = draw(img, comment, x-10, y, h, 36)
            else:
                comment = "닮은 연예인이 없네요\nㅜㅜ 성형하고 오세요!\n"
                img = cv2.imread("test_img/ojingeo.jpg")
                result = draw(img, comment, 50, 10, h, 24)
            
            print("거리: %.3f" % dist[0])
            print(comment)
            cv2.imshow(name, result)
#             result = cv2.cvtColor(result, cv2.COLOR_BGR2RGB) # BGR -> RGB
#             plt.imshow(result)

        break
    
cv2.waitKey(0)
cv2.destroyAllWindows()


버전 2)

user_name = input("너의 이름은? ") # 사용자 이름 입력

cap = cv2.VideoCapture(0) # 노트북 웹캠을 카메라로 사용
cap.set(3,640) # 너비
cap.set(4,480) # 높이

while(True):
    ret, frame = cap.read()
    frame = cv2.flip(frame, 1) # 좌우 대칭
    
    cv2.imshow('frame', frame)
    
    k = cv2.waitKey(30) & 0xff 
    if k == 49: # 1 키를 누르면 사진 찍음.
        cap.release()
        cv2.destroyAllWindows()
        
        rects, shapes, _ = find_faces(frame) # 얼굴 찾기
        descriptors = encode_faces(frame, shapes) # 인코딩

        if(len(descriptors) == 0):
            print("얼굴 인식이 안되었네요ㅜㅜ \n다시 찍어주세요!")
        elif(len(descriptors) > 1):
            print("여러 명이 인식이 되었네요ㅜㅜ \n혼자 다시 찍어주세요!")
        else:
            desc = descriptors[0]
            x = rects[0][0][0] # 얼굴 X 좌표
            y = rects[0][0][1] # 얼굴 Y 좌표
            w = rects[0][1][1]-rects[0][0][1] # 얼굴 너비 
            h = rects[0][1][0]-rects[0][0][0] # 얼굴 높이        

            descs1 = sorted(descs, key=lambda x: np.linalg.norm([desc] - x[1]))
            dist = np.linalg.norm([desc] - descs1[0][1], axis=1)
            if dist < 0.45:
                name = descs1[0][0]
                comment = "{0}을 닮으셨네요. 올~~".format(name) 
                img = cv2.imread(label_class[name])
#                 img = cv2.resize(img, dsize=(780, 520))
                result = draw(img, comment, x-10, y, h, 36)
            else:
                print(dist)
                comment = "{0}님은 닮은 연예인이 없네요\nㅜㅜ 성형하고 오세요!\n".format(user_name)
                img = cv2.imread("test_img/ojingeo1.png")
                img = cv2.resize(img, dsize=(w, h+30)) 
                frame[y-30:y+h, x:x+w] = img 
                result = draw(frame, comment, 50, 10, h, 24)

            print(comment)
#             cv2.imshow(name, result)
            result = cv2.cvtColor(result, cv2.COLOR_BGR2RGB) # BGR -> RGB
            plt.imshow(result)

        break
    
cv2.waitKey(0)
cv2.destroyAllWindows()


결과는 아래와 같은 식으로 나온다. 여러 버전이 있으니, 맘에 드는 식으로 바꿔서 사용하면 좋을 듯.

닮은 사람이 있을 때
닮은 사람이 없을 때


github: https://github.com/kimjinho1/find_similar_celebrity/blob/master/Find_Similar_Celebrities.ipynb


kimjinho1/find_similar_celebrity

닮은 연예인 찾기. Contribute to kimjinho1/find_similar_celebrity development by creating an account on GitHub.

github.com

728x90
반응형
728x90
반응형

꽤 전에 완성을 했었는데 블로그에 올린다는 것을 완전히 까먹고 있었다.

전에 얼굴 탐지 및 전처리, 데이터 크롤링 등등의 글들을 올렸었는데, 

그 이후 조금의 삽질 과정이 있었고 결국 완성했다. 

얼굴 인식도 잘 되고 모자이크 처리도 잘 된다. 하지만...

컴퓨터 성능이 안 좋아서 그런지, 랜드마크를 추출하는데 시간이 오래 걸려서 그런지

프레임이 매우 매우 낮다. 이 문제가 나중에 해결된다면 업데이트하겠다.


얼굴 인식은 아래와 같이 진행된다.  

1. 데이터베이스에 인식하고 싶은 사람의 얼굴 랜드마크를 저장.

2. 실시간으로 사람 얼굴을 탐지하고 그 얼굴의 랜드마크를 추출.

3. 데이터베이스에 있는 랜드마크와 새로 추출된 랜드마크의 거리를 측정.

4. 제일 짧은 거리가 0.45 이하라면 그 사람으로 인식, 아니라면 모르는 사람이라고 인식.

5. 인식된 사람이라면 그대로 내버려 두고, 모르는 사람이라면 모자이크 처리를 함.

아래는 그 코드이다.

사용한 라이브러리)

# 라이브러리
import dlib, cv2
import numpy as np
import matplotlib.pyplot as plt
from PIL import ImageFont, ImageDraw, Image
import tensorflow.keras 
from tensorflow.keras import backend as K

detector = dlib.get_frontal_face_detector()
sp = dlib.shape_predictor('models/shape_predictor_68_face_landmarks.dat')
facerec = dlib.face_recognition_model_v1('models/dlib_face_recognition_resnet_model_v1.dat')


함수들)

# 얼굴 탐지
def find_faces(img):
    dets = detector(img, 1)
    
    if len(dets) == 0:
        return np.empty(0), np.empty(0), np.empty(0)
    
    rects, shapes = [], []
    shapes_np = np.zeros((len(dets), 68, 2), dtype=np.int)
    for k, d in enumerate(dets):
        rect = ((d.left(), d.top()), (d.right(), d.bottom()))
        rects.append(rect)

        shape = sp(img, d)
        
        # convert dlib shape to numpy array
        for i in range(0, 68):
            shapes_np[k][i] = (shape.part(i).x, shape.part(i).y)

        shapes.append(shape)
        
    return rects, shapes, shapes_np

# 랜드마크 추출
def encode_faces(img, shapes):
    face_descriptors = []
    for shape in shapes:
        face_descriptor = facerec.compute_face_descriptor(img, shape)
        face_descriptors.append(np.array(face_descriptor))

    return np.array(face_descriptors)


데이터베이스 생성)

# 인식하고 싶은 사람들 이미지 지정
# 여기는 사용자가 원하는 대로 바꾸면 된다. 
img_paths = {
     '진호': 'user_img/jinho.jpg',
     '태호': 'user_img/taeho.jpg',
     '아이린': 'user_img/irene.jpg',
     '조이': 'user_img/joy.jpeg',
     '창모': 'user_img/changmo.jpg',
     '홍철': 'user_img/hongchul.jpg',
     '명수': 'user_img/myungsoo.jpg'
}

# 인식하고 싶은 사람들의 얼굴 랜드마크 추출후 저장
descs = []

for name, img_path in img_paths.items(): 
    img = cv2.imread(img_path)
    _, img_shapes, _ = find_faces(img)
    descs.append([name, encode_faces(img, img_shapes)[0]])
    
np.save('user_img/descs.npy', descs)
print(descs)


실시간 얼굴 인식과 모자이크 처리)

cam = cv2.VideoCapture(0) # 노트북 웹캠 사용
cam.set(3, 640) # 너비
cam.set(4, 480) # 높이
font = cv2.FONT_HERSHEY_SIMPLEX # 폰트

while True:
    
    ret, img = cam.read() 
    img = cv2.flip(img, 1) # 좌우 대칭
#    img = cv2.cvtColor(img, cv2.COLOR_BGR2RGB)
    rects, shapes, _ = find_faces(img) # 얼굴 찾기
    descriptors = encode_faces(img, shapes) # 인코딩
    
    for i, desc in enumerate(descriptors):
        x = rects[i][0][0] # 얼굴 X 좌표
        y = rects[i][0][1] # 얼굴 Y 좌표
        w = rects[i][1][1]-rects[i][0][1] # 얼굴 너비 
        h = rects[i][1][0]-rects[i][0][0] # 얼굴 높이
        
        # 추출된 랜드마크와 데이터베이스의 랜드마크들 중 제일 짧은 거리를 찾는 부분
        descs1 = sorted(descs, key=lambda x: np.linalg.norm([desc] - x[1]))
        dist = np.linalg.norm([desc] - descs1[0][1], axis=1)
        
        if dist < 0.45: # 그 거리가 0.45보다 작다면 그 사람으로 판단 
            name = descs1[0][0]
        else:           # 0.45보다 크다면 모르는 사람으로 판단 -> 모자이크 처리
            name = "누구?"
            mosaic_img = cv2.resize(img[y:y+h, x:x+w], dsize=(0, 0), fx=0.04, fy=0.04) # 축소
            mosaic_img = cv2.resize(mosaic_img, (w, h), interpolation=cv2.INTER_AREA)  # 확대
            img[y:y+h, x:x+w] = mosaic_img # 인식된 얼굴 영역 모자이크 처리 

        cv2.rectangle(img, (x, y), (x+w, y+h), (0,255,0), 2) # 얼굴 영역 박스 
        cv2.putText(img, str(dist)[1:6], (x+5,y+h-5), font, 2, (0,0,255), 4) # 사진에 거리 출력

#     영어
#     cv2.putText(img, name, (x+5,y-5), font, 2, (255,255,255), 4)

#     한글
    img = Image.fromarray(img)
    draw = ImageDraw.Draw(img)
    draw.text((x+5,y-50), name, font=ImageFont.truetype("./batang.ttc", 60), fill=(255,255,255))
    img = np.array(img)
        
    cv2.imshow('camera', img)
    
    k = cv2.waitKey(10) & 0xff # 'ESC' 키 누르면 종료
    if k == 27:
        break
        
cam.release()
cv2.destroyAllWindows()


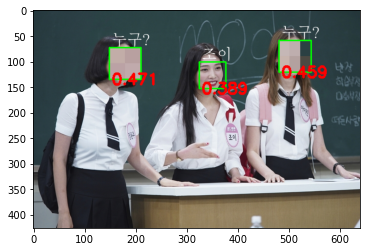
실시간 X 그냥 얼굴 인식과 모자이크 처리)

img = cv2.imread('test_img/inf.jpg')

rects, shapes, _ = find_faces(img) # 얼굴 찾기
descriptors = encode_faces(img, shapes) # 인코딩

for i, desc in enumerate(descriptors):
    x = rects[i][0][0] # 얼굴 X 좌표
    y = rects[i][0][1] # 얼굴 Y 좌표
    w = rects[i][1][1]-rects[i][0][1] # 얼굴 너비 
    h = rects[i][1][0]-rects[i][0][0] # 얼굴 높이        
        
    # 추출된 랜드마크와 데이터베이스의 랜드마크들 중 제일 짧은 거리를 찾는 부분
    descs1 = sorted(descs, key=lambda x: np.linalg.norm([desc] - x[1]))
    dist = np.linalg.norm([desc] - descs1[0][1], axis=1)

    if dist < 0.45: # 그 거리가 0.45보다 작다면 그 사람으로 판단 
        name = descs1[0][0]
    else:           # 0.45보다 크다면 모르는 사람으로 판단 -> 모자이크 처리
        name = "누구?"
        mosaic_img = cv2.resize(img[y:y+h, x:x+w], dsize=(0, 0), fx=0.04, fy=0.04) # 축소
        mosaic_img = cv2.resize(mosaic_img, (w, h), interpolation=cv2.INTER_AREA) # 확대
        img[y:y+h, x:x+w] = mosaic_img # 인식된 얼굴 영역 모자이크 처리
        
    cv2.rectangle(img, (x, y), (x+w, y+h), (0,255,0), 2) # 얼굴 영역 박스 
    cv2.putText(img, str(dist)[1:6], (x+5,y+h+10), font, 1, (0,0,255), 4) # 사진에 거리 출력
    
#     영어
#     cv2.putText(img, name, (x+5,y-5), font, 2, (255,255,255), 4)

#     한글
    img = Image.fromarray(img)
    draw = ImageDraw.Draw(img)
    draw.text((x+5,y-30), name, font=ImageFont.truetype("./batang.ttc", 30), fill=(255,255,255))
    img = np.array(img)

img = cv2.cvtColor(img, cv2.COLOR_BGR2RGB)        
plt.imshow(img)


일단 모델 파일 3개를 아래 주소를 통해 다운로드해야 된다.

github.com/davisking/dlib-models/raw/master/shape_predictor_68_face_landmarks.dat.bz2

github.com/kairess/simple_face_recognition/raw/master/models/dlib_face_recognition_resnet_model_v1.dat

github.com/kimjinho1/Real-time-face-recognition-and-mosaic-using-deep-learning/raw/master/models/dlib_face_recognition_resnet_model_v1.dat

그리고 데이터베이스 생성 부분에서 본인의 파일 상황에 맞게 img_paths 안에 이름과 파일 경로를 바꿔줄 필요가 있다. 

결과 사진)

무한도전
창모
조이


데이터베이스에 박명수, 노홍철, 창모, 조이 등등의 사진이 있었는데 딱 지정된 사람의 얼굴만 인식하고

다른 사람들의 얼굴은 모드 모자이크 처리한 것을 볼 수 있다.

github: https://github.com/kimjinho1/Real-time-face-recognition-and-mosaic-using-deep-learning/blob/master/real-time_face_recognition_and_mosaic.ipynb


kimjinho1/Real-time-face-recognition-and-mosaic-using-deep-learning

딥러닝을 이용한 실시간 얼굴 인식과 모자이크 처리. Contribute to kimjinho1/Real-time-face-recognition-and-mosaic-using-deep-learning development by creating an account on GitHub.

github.com

728x90
반응형

+ Recent posts